How to Observe the Sun Safely: ND 5.0, Front-Mounted Only
Every other target in this hobby forgives a mistake. The Sun does not. Learning how to observe the Sun safely is really about learning one rule and then never breaking it: the light must be cut down to a safe level before it enters the telescope, not after. Get that right and daytime observing is the most reliable astronomy in Britain, because you are no longer waiting for a clear midnight in a country that rarely supplies one.
The damage is also silent. The retina has no pain receptors, so solar retinopathy gives you no warning at the moment it happens. People notice a blurred or blank patch in the centre of their vision hours later, and it can be permanent. That is the whole reason the rules below are written as absolutes rather than as advice.
The one rule: the filter goes on the front
A telescope is a light funnel. A 200mm Dobsonian collects roughly 800 times more light than a 7mm pupil, and it concentrates that into a beam a few millimetres across near the focuser. Anything sitting at the eyepiece end has to survive that concentrated beam.
That is why screw-in “sun filters” that thread onto an eyepiece are the single most dangerous item ever sold to amateur astronomers. They sit at the focus of all that heat and they crack, sometimes within a minute, sometimes after ten minutes of apparently working fine. When one fails, your eye is already at the eyepiece. If you bought a second-hand telescope from the 1980s or 1990s and found a small dark filter in the accessory tray marked “SUN”, throw it away rather than sell it on.
A safe visual solar filter is a full-aperture filter that covers the front of the telescope, so the light is attenuated before any of it is concentrated. Two things have to be true of it:
- It transmits about 1/100,000th of the sunlight, an optical density of 5.0, blocking 99.999 per cent of the intensity.
- It blocks the infrared and ultraviolet as well as the visible. This is the part cheap improvisations always fail. A neutral density filter that merely looks dark can still let through the invisible radiation that cooks the retina, and because the view does not feel bright, you keep staring.
The standard material is Baader AstroSolar Safety Film ND 5.0, a coated polymer film sold in sheets from A4 upwards and made in Germany. It shows the Sun close to its true colour, a neutral white with a slight blue cast, rather than the orange of cheaper glass filters. Note the density carefully: Baader also sells a photographic film at ND 3.8, which is roughly 16 times brighter and is not safe for looking through. Buying the wrong one of two similarly named products is the commonest way people end up with an unsafe setup.
Glass full-aperture filters from Thousand Oaks Optical and similar makers are the alternative. They are tougher and give an orange-tinted Sun, at the cost of some sharpness against the film.
Fitting it without inventing a hazard
A front filter that can be knocked off by a sleeve is not a safe filter. Whether you build a cell out of card and film or buy a ready-made one, it must be a snug friction fit on the tube with tape or a retaining screw as backup, and you should tug it firmly before every session.
Then deal with the finder. A 50mm finderscope is a small unfiltered telescope pointed at the Sun, and people forget it exists until they instinctively put an eye to it. Cap the finder or fit it with its own filter. A red dot finder is safer only in that it has no optics to look through, but it still needs covering so nobody uses it as a sight line. To aim the telescope without either, watch the shadow of the tube on the ground and minimise it.
Never do these
- Never look at the Sun through an unfiltered telescope, binoculars or a camera viewfinder, even for a fraction of a second, and even at sunrise or sunset.
- Never use welding glass below shade 14, smoked glass, exposed film, floppy disk material, CDs, mylar food packaging or stacked sunglasses. All are internet folklore and none control the infrared reliably.
- Never leave a filtered telescope set up and unattended in the garden. A child at the eyepiece with a filter that has slipped is the accident that actually happens.
- Never point an unfiltered telescope at the Sun even with nobody looking. The heat can melt a plastic focuser, char a diagonal, or destroy the coatings on a Schmidt-Cassegrain’s corrector and secondary.
Projection: fine for a refractor, not for everything
The old solar projection method, holding a white card behind the eyepiece and letting the Sun’s image fall on it, is a good way to show a group of people sunspots at once and it never puts an eye near the light path.
It suits a small achromatic refractor. It does not suit a Schmidt-Cassegrain or a Maksutov, where the sealed tube traps heat and the concentrated beam sits on internal optics, and manufacturers explicitly warn against it. It is also hard on cemented eyepiece elements, so project with a simple Huygens or Ramsden if you have one rather than a good multi-element eyepiece. Keep sessions short and let the telescope cool between them.
Eclipse glasses and the ISO number
For naked-eye viewing during a partial eclipse, the item you want is a certified solar viewer meeting ISO 12312-2:2015. UKHSA’s eclipse viewing guidance says the same, and the Royal Observatory Greenwich sells viewers that carry the mark.
Two limits people miss. First, the certification claim is only as good as the seller, and the American Astronomical Society keeps a reputable-vendors list and an explanation of what the standard does and does not prove, because an ISO number printed on cardboard is not itself a test result. Second, and more importantly, eclipse glasses are for naked-eye use only. Holding a pair in front of a telescope, binoculars or a camera lens is not filtering: the optics concentrate the beam onto the flimsy film and it fails. Solar film sold for telescopes carries the same warning in reverse, since it is not certified for use as a handheld viewer.
The next chances from Britain are 2 August 2027, when a total eclipse crosses southern Spain and North Africa and the UK gets a partial phase, and 26 January 2028, an annular eclipse that is partial here and best in the west: around 55 per cent coverage in Cornwall, 51 per cent in west Wales and 42 per cent in Northern Ireland, low in the south-western sky near sunset. The Royal Museums Greenwich eclipse explainer is a good place to check circumstances closer to the time.
What you actually see, and when
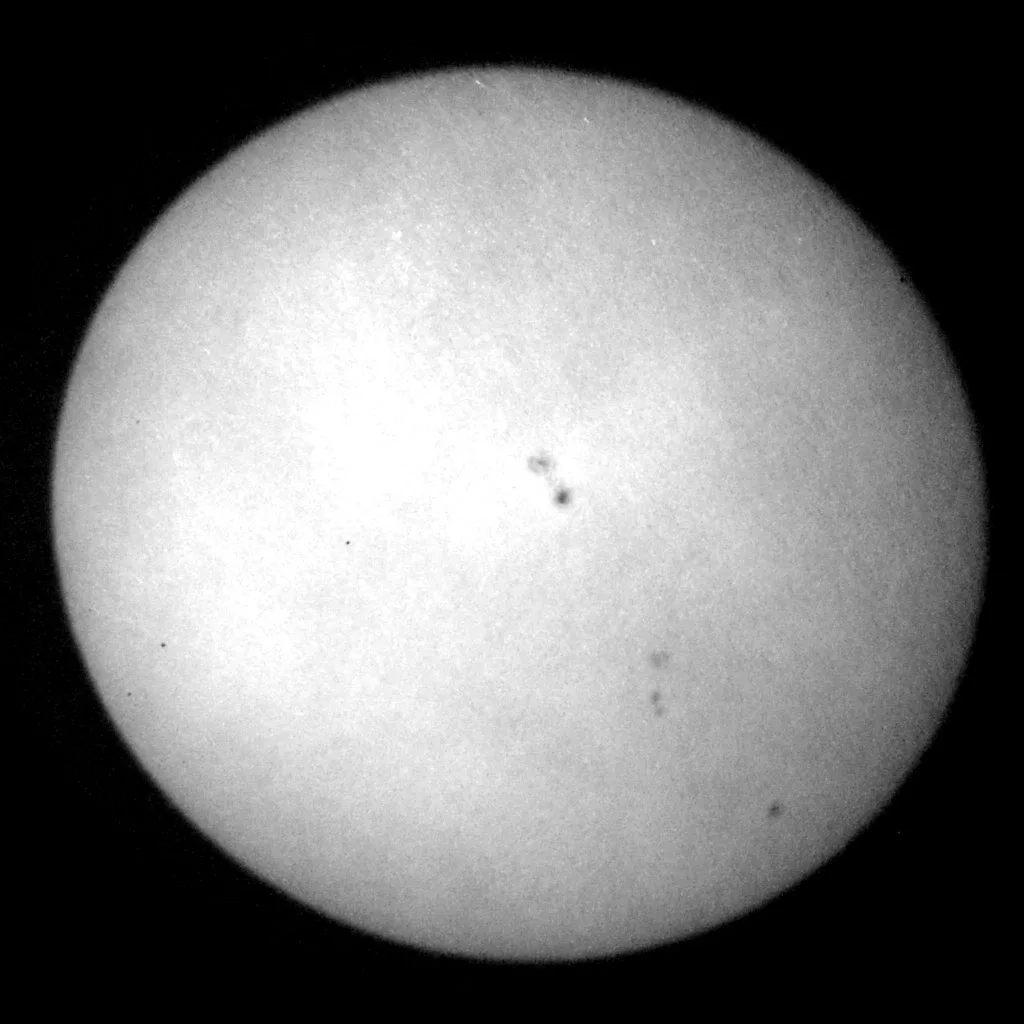
In white light, filtered as above, the Sun is a plain white disc showing three things: sunspots with dark umbrae and lighter penumbrae, faculae as bright veined patches near the limb, and limb darkening, the visible edge being noticeably dimmer than the centre. On good days you can pick out granulation, the convection cells that give the surface a rice-grain texture.
Timing matters at the moment. Solar Cycle 25 peaked around October 2024, and the yearly mean sunspot number fell from about 150 in 2024 to roughly 85 in 2025 as the cycle entered its declining phase. There is still plenty to see through 2026 and 2027, and declining phases often produce the biggest individual active regions, but the run of daily double-digit spot groups is behind us. The pattern is worth knowing because it shapes what a first solar session looks like: on a quiet week the disc can genuinely be blank.
Seeing is the other constraint, and it is worse than at night. The ground heats through the morning and the turbulent air above tarmac and rooftops wrecks the view by early afternoon. Observe in the first two or three hours after sunrise if you can, over grass rather than a patio, and expect the image to boil at high power. Solar work rewards patience at 60x to 100x far more than it rewards magnification, the same trade covered in our guide to telescope eyepieces.
Hydrogen-alpha: a different Sun, a different budget
Everything above is white light. A hydrogen-alpha telescope filters to a narrow band around 656.3nm and shows the chromosphere instead of the photosphere: prominences arching off the limb, dark filaments snaking across the disc, bright plages around active regions. It looks nothing like the white-light Sun and it is the reason people get seriously hooked.
The entry point remains the Coronado PST, a 40mm f/10 dedicated solar telescope of about 400mm focal length with the etalon and blocking filter built in, so there is nothing to fit wrongly. The standard version has a bandpass around 1 Angstrom; the double-stacked version narrows this to about 0.5 Angstrom for more surface contrast at a considerably higher price. Lunt Solar Systems make the main competing range, starting at similar apertures.
Two honest caveats. These are sealed systems, so the safety is designed in, but they are also single-purpose: a PST is close to useless at night. And the 40mm aperture limits resolution, so the first look often underwhelms people who have seen space-telescope imagery. Try one at a star party or a solar day before buying. Our roundup of UK stargazing events and star parties lists the sort of meetings where a member will usually have one set up.
The other genuinely safe white-light route for refractor owners is a Herschel wedge, a prism that dumps most of the solar energy out of the back of the housing and passes a small fraction to the eyepiece. It gives sharper white-light views than film. It works only on refractors: fitted to a reflector or a catadioptric, the full solar beam has already been concentrated onto a secondary mirror before it reaches the wedge. It also needs an ND filter in the train, and it needs checking for cracks and secure mounting before every use.
A short pre-flight routine
Run through this every time, in this order, before the tube comes off the horizontal:
- Front filter fitted, tugged, and inspected against a bright bulb for pinholes and scratches. Discard film with any hole in it.
- Finder capped or filtered. Red dot covered.
- Everyone present told not to look through anything, and children kept within arm’s reach.
- Telescope aimed by tube shadow, not by sighting.
- Filter checked again after any move of the tube or the mount.
Solar observing is not a risky corner of astronomy so long as that list runs first. It is simply the only part of the hobby where the equipment, not the weather, decides whether you get to keep doing it. If you are new to the mount and finder side of this, start with our beginner’s guide to using a telescope at night, where a mistake costs you nothing.
Frequently asked questions
Can I use eclipse glasses with a telescope or binoculars? No. Certified eclipse glasses are rated for naked-eye viewing only. Optics concentrate sunlight onto the film and it can fail in seconds. A telescope needs a full-aperture filter fitted to the front of the tube instead.
Is a solar filter that screws into an eyepiece ever safe? No. Eyepiece-end sun filters sit in the concentrated beam and are known to crack from heat build-up while your eye is at the eyepiece. If a second-hand telescope came with one, dispose of it.
What optical density do I need for looking through the telescope? ND 5.0, which transmits about one hundred-thousandth of the incident sunlight, and which also blocks infrared and ultraviolet. The ND 3.8 photographic film sold by the same makers is for cameras only and is not safe for visual use.
Can I use my Schmidt-Cassegrain or Maksutov for solar projection? No. Sealed catadioptric tubes trap heat and concentrate the beam on internal optics, and the makers warn against projection. Use a front-mounted full-aperture filter on those designs, or project only with a small achromatic refractor.
Do I need to cover the finderscope? Yes. A finder is an unfiltered telescope in its own right and is the most likely thing a person puts an eye to by reflex. Cap it or fit it with its own filter, and aim the telescope by minimising the shadow of the tube on the ground.
What is the difference between a white-light and a hydrogen-alpha view? White light shows the photosphere: sunspots, faculae and limb darkening. Hydrogen-alpha isolates 656.3nm and shows the chromosphere above it, including prominences at the limb and filaments across the disc. They are different layers of the Sun, not different qualities of the same view.
Clear skies forecast? Get a nudge.
Our weekly email flags the next good UK observing window and one easy target to find.
Join the listMore from Starvest
Keep reading
Best Telescopes for Beginners in the UK (Tested by Price Bracket)
The best beginner telescopes in the UK by budget, from sub-£150 tabletop scopes to app-guided and smart telescopes, with real 2026 prices.
What Can You See with Binoculars at Night? A Realistic Astronomy List
A realistic list of what you can see with binoculars in astronomy, from the Moon and Jupiter's moons to Andromeda, with tips for spotting each from the UK.
How to Set Up and Use Your First Telescope (Step by Step)
How to use a telescope as a beginner: assemble the mount, align the finder, focus, and find your first targets. A clear step-by-step UK guide.