How to Polar Align a Telescope: 3 Methods, UK Settings
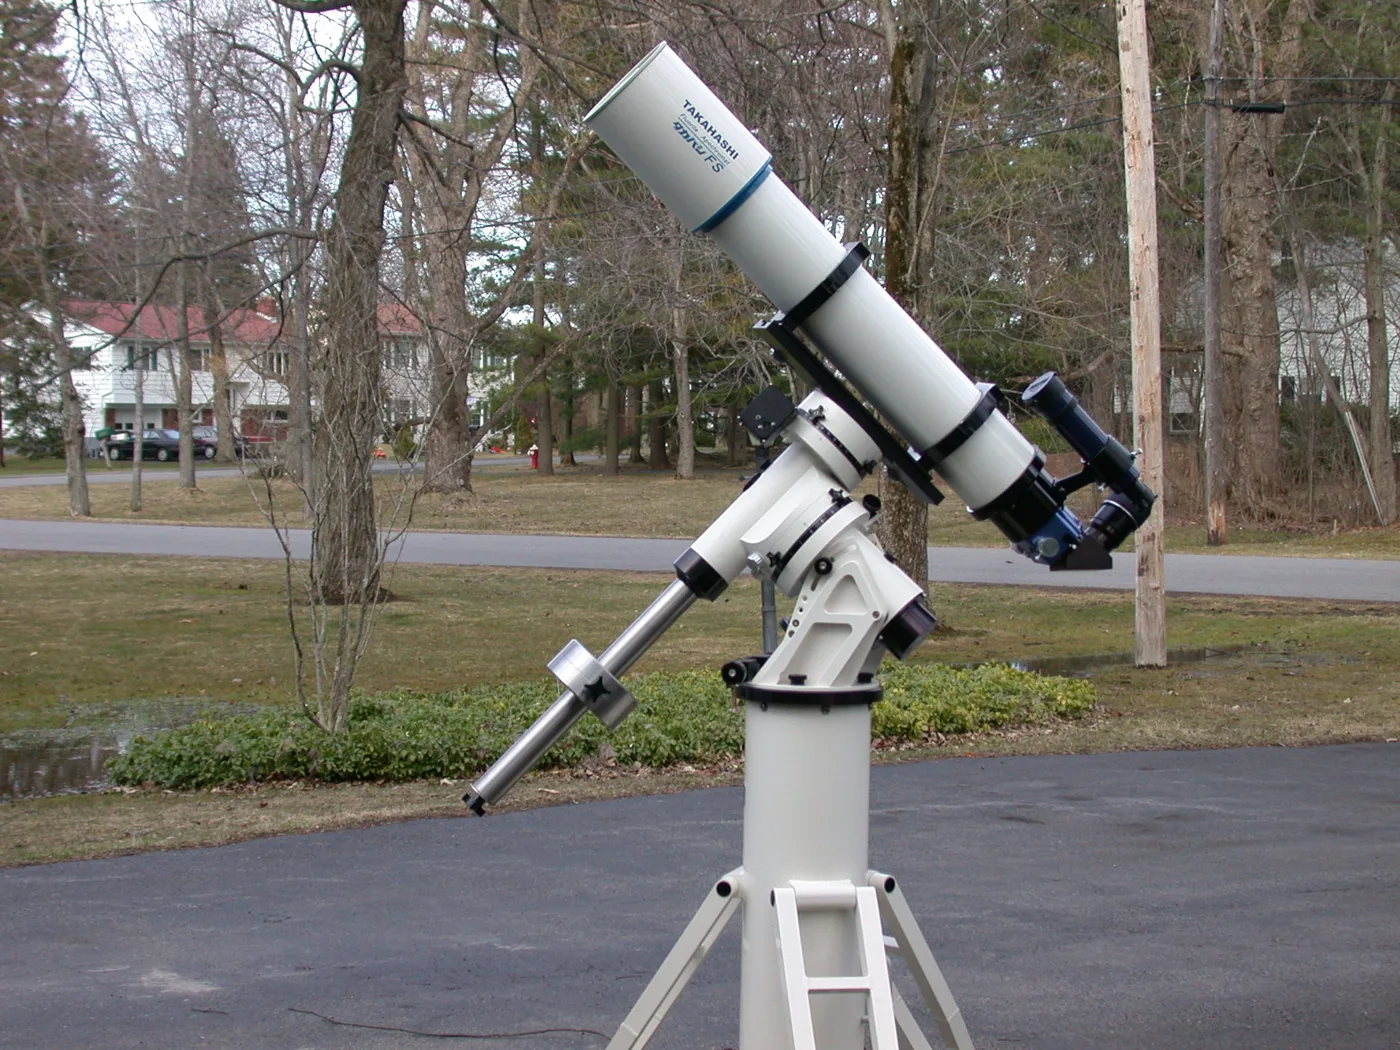
Learning how to polar align a telescope is the step that turns an equatorial mount from a heavy, awkward tripod into something that follows the sky with one slow knob or one small motor. It sounds technical and the manuals make it look worse than it is. The job is simple: point the mount’s right ascension (RA) axis at the celestial pole, the spot in the sky the whole night rotates around. Get that right and a star stays put when you track in RA. Get it wrong and your target slides out of view, or smears in a photograph.
This page covers the three ways to do it from Britain, the settings that change with where you live, and the honest answer to how close you actually need to be. If you are still deciding whether you want an equatorial mount at all, read Dobsonian vs equatorial mount first. Dobsonians and alt-azimuth mounts never need polar aligning.
Polaris is not the pole
The most common beginner mistake is pointing the mount straight at Polaris and calling it done. Polaris sits roughly two-thirds of a degree from the true north celestial pole in 2026, a bit more than the width of the full Moon. Over a night it traces a small circle around the real pole, and the pole itself is an empty patch of sky with no bright marker.
For looking through an eyepiece with a manual mount, pointing at Polaris is close enough. For a motor drive at high power, or for any photography, that two-thirds of a degree matters, and it is the whole reason polar scopes and alignment apps exist.
Before you start: level, latitude and north
Three things have to be roughly right before any method works.
Level the tripod. Use the bubble level on the mount or a phone level on the tripod head. An unlevel mount means altitude and azimuth adjustments interfere with each other and you chase the pole round in circles.
Set the latitude scale to where you are. The angle of the RA axis above the horizon equals your latitude. Every equatorial mount has a scale on the side and one or two bolts that tilt the head. Sky-Watcher’s EQ3-2 and EQ5 manual tells you to set the latitude indicator to your local latitude using the T-bolts. UK values to the nearest half degree:
| Place | Latitude to set |
|---|---|
| Plymouth | 50.5 degrees |
| London, Cardiff | 51.5 degrees |
| Birmingham | 52.5 degrees |
| Manchester | 53.5 degrees |
| Belfast | 54.5 degrees |
| Edinburgh, Glasgow | 56 degrees |
| Inverness | 57.5 degrees |
| Lerwick | 60 degrees |
Mount scales are coarse, so treat this as a starting point. You will fine tune altitude in the next step anyway.
Face the mount north. The RA axis, usually the end with the polar scope cap, points north. A phone compass is fine here. According to the British Geological Survey, magnetic north over the UK is currently a little east of true north and differs by only a few degrees across the country, so a compass gets you close enough for the rough stage. Keep the phone away from the steel mount and counterweights, which pull the needle.
Method 1: rough alignment by eye
Best for: visual observing on a manual EQ mount, and as the first stage of the other two methods.
- With the tripod level and latitude set, put the telescope in its home position: counterweight bar pointing down, tube pointing up along the RA axis.
- Set the declination axis to 90 degrees so the tube is parallel to the RA axis.
- Look along the side of the tube, or through a finder, and move the whole tripod left or right until Polaris is roughly in line.
- Adjust altitude with the latitude bolts, not by moving the tube, until Polaris sits in the finder.
That takes two or three minutes and puts you within a degree or two. For visual work with slow-motion cables it is all most people ever do. You will nudge the declination knob now and then, which is normal.
Finding Polaris itself: follow the two stars at the end of the Plough’s bowl upwards about five times their separation. Our how to read a star chart page shows the pattern.
Method 2: the polar scope
Best for: motor-driven observing, planetary imaging and short-exposure deep sky photography.
Many EQ mounts accept a small telescope that looks straight through the hollow RA axis. Inside is an etched reticle with a circle showing where Polaris should sit relative to the true pole. The Sky-Watcher polarscope sold by First Light Optics fits the EQ3-2, EQM-35, HEQ5, EQ5 and EQ6 families and uses a clock-face reticle.
- Do the rough alignment first. Remove both caps from the RA axis and rotate the declination axis so the tube is not blocking the view.
- Look through the polar scope. If Polaris is not in view, adjust azimuth (the two knobs pushing on the mount’s base peg) and altitude until it is.
- Find out where Polaris should be on the reticle right now. It changes with the date and time. The Sky-Watcher SynScan app, the free Polar Scope Align app and many handsets show a clock position, for example “Polaris at 4 o’clock”.
- Check the reticle’s orientation. Rotate the RA axis until the reticle’s 12 o’clock mark is at the top, or follow your mount’s own instruction for zeroing it.
- Use only the altitude and azimuth adjusters to move Polaris onto that clock position on the circle. Never use the RA or declination motions for this step.
- Tighten the locking bolts gently and look again. Tightening often shifts the view slightly, so leave a little allowance.
Two practical points. The reticle is invisible in the dark without light: some mounts have an illuminator built in, others need a small add-on. And it is worth checking the polar scope is centred in the axis once in daylight, by looking at a distant object and rotating RA. If the object swings round in a circle, the scope needs adjusting before it can give you an accurate result.
A careful polar scope alignment typically gets you within a few arcminutes, which is enough for unguided exposures of a minute or so at modest focal lengths.
Method 3: drift alignment and software alignment
Best for: long-exposure deep sky imaging, and anyone whose polar scope view is blocked.
Drift alignment uses the stars themselves as a test. You watch a star at high power, or record it on a camera, and see which way it drifts in declination while the mount tracks. A star near the meridian and the celestial equator shows azimuth error. A star low in the east or west shows altitude error. You correct one axis, then the other, then repeat. It is slow, often 30 minutes or more, but it needs no view of the pole at all, which helps if a house or tree hides Polaris.
The DARV variant (Drift Alignment by Robert Vice) speeds this up with a camera: take a two-minute exposure in which the mount slews slowly one way then back. If polar alignment is good, the out and back star trails overlap. If they split into a V, the angle shows how far out you are.
Software alignment now does most of this work for imagers. Tools such as the Polar Align feature in SharpCap Pro, the ASIAIR’s polar alignment routine and N.I.N.A. plug-ins take a few images, plate solve them and tell you exactly which way to turn each knob. The main requirement is a camera attached to the scope or a guide scope, and most of these routines work even when Polaris is blocked. For astrophotography this is now the normal approach, and you can read more about beginner imaging kit in best telescope for astrophotography beginners.
How accurate do you really need to be?
This is the question the forums argue about most, and the answer depends on what you are doing.
| What you are doing | How close to aim for | Method that gets you there |
|---|---|---|
| Visual, manual slow-motion controls | Within 1 to 2 degrees | Rough alignment |
| Visual with RA motor drive or GoTo | Within about half a degree | Rough plus polar scope |
| Moon and planet video imaging | Within about half a degree | Polar scope |
| Unguided deep sky, subs up to about a minute | Within a few arcminutes | Polar scope done carefully, or software |
| Guided deep sky, long subs | Within a few arcminutes or better | Software or drift |
The reason photography is stricter comes down to arithmetic. The sky turns 15 arcseconds every second of time. A polar alignment error makes stars creep in declination at up to that rate multiplied by the error in radians. One arcminute of error is about 0.00029 radians, so the worst-case drift is roughly 0.26 arcseconds per minute of exposure for each arcminute you are out. At 10 arcminutes out, a 60-second exposure can drift about 2.6 arcseconds, which is visible at longer focal lengths. At half a degree out, the same exposure can drift close to 8 arcseconds. At the eyepiece nobody would notice either.
A GoTo mount’s star alignment is separate from polar alignment. The handset can compensate for a sloppy polar alignment when pointing, so objects still land in the eyepiece, but it cannot stop field rotation or declination drift in photographs.
Common problems and fixes
Polaris will not come into the polar scope view. The latitude is usually a few degrees out. Loosen one altitude bolt, tighten the other, and sweep slowly. If the mount has run out of travel, the latitude range of the mount may not suit your location or the bolt may need moving to a different hole.
The alignment was perfect, then drifted after a few minutes. Soft ground or a deck settling under the tripod. Put the feet on paving slabs, or wait ten minutes after setting up before aligning.
Tightening the bolts moves the star. Nearly universal on budget mounts. Leave the star slightly off in the opposite direction before you tighten, then check.
Nothing shows in the polar scope at all. The declination axis is probably blocking it. Rotate the tube 90 degrees in declination so the hole through the mount is clear.
Everything dews up. A polar scope and a finder pointing up at a clear sky collect dew fast. Cap the polar scope once you are finished and see how to stop telescope dew.
Frequently asked questions
Do I need to polar align a Dobsonian or alt-az telescope? No. Only equatorial mounts need polar alignment. Dobsonians and alt-azimuth mounts move up-down and left-right, so there is no polar axis to align. Smart telescopes such as the Seestar handle orientation themselves in alt-az mode.
Can I polar align without seeing Polaris? Yes. Drift alignment and plate-solving software such as SharpCap Pro or an ASIAIR can align the mount while Polaris is hidden behind a house or tree. For visual use you can also set the latitude carefully and point the mount at true north with a corrected compass bearing.
What latitude should I set on my mount in the UK? Set the scale to your own latitude: about 50.5 degrees in Plymouth, 51.5 in London and Cardiff, 53.5 in Manchester and 56 in Edinburgh or Glasgow. The scale on most mounts is coarse, so fine tune altitude by looking at Polaris.
How long does polar alignment take? Rough alignment takes two or three minutes. A polar scope alignment takes about five to ten minutes once you know your mount. Traditional drift alignment can take half an hour or more, while plate-solving software usually gets it done in a few minutes.
Do I have to polar align every time I set up? Yes, if you move the tripod. Some observers mark the tripod foot positions on a patio with paint or small studs so the mount goes back in almost the same spot, which cuts the time to a quick check.
Why do my stars still trail after polar aligning? Polar alignment only removes declination drift. Trailing in right ascension usually comes from periodic error in the gears, poor balance, the wrong tracking rate, or exposures that are too long for an unguided mount at that focal length.
Clear skies forecast? Get a nudge.
Our weekly email flags the next good UK observing window and one easy target to find.
Join the listMore from Starvest
Keep reading
Best Telescopes for Beginners in the UK (Tested by Price Bracket)
The best beginner telescopes in the UK by budget, from sub-£150 tabletop scopes to app-guided and smart telescopes, with real 2026 prices.
What Can You See with Binoculars at Night? A Realistic Astronomy List
A realistic list of what you can see with binoculars in astronomy, from the Moon and Jupiter's moons to Andromeda, with tips for spotting each from the UK.
How to Set Up and Use Your First Telescope (Step by Step)
How to use a telescope as a beginner: assemble the mount, align the finder, focus, and find your first targets. A clear step-by-step UK guide.